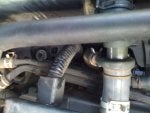
Finally got my RBC installed. This was the biggest pain of an install ever. I swear doing an engine swap is easier. We need to add a tips and tricks section to the RBC sticky, as there are lots of little things you have to change and get just right. Anyways, I don't have a CAI yet so I made my stock box fit. All you have to do is remove two of the three bolts holding the box. Leave the nut on the back left of the box on loose and force the box and intake arm into position. Then screw the nut down tight once it fits. The lower pickup won't stay put anymore by itself so you'll need to add a hose clamp to it, so that it stays on. See attached pics...
Tips:
1) Double bolt/nut: Both Head studs need to come out to get the RBC into position, and it makes the PRC easier to get out. You do this by putting a second nut on the stud and tightening them together. Then you can remove and reinstall the studs.
2) Your cutting on the RBC need to be exact, and close to the gasket template.
3) 02-04 and 05-06 TB gaskets are different, if you order some off the internet make sure the person you're ordering from knows they're different or you'll be making modifications.
4) MAP and TPS clips are the exact same, make sure you know which is which when you take them off, or else you'll be extending both of them. BTW, don't just unwrap your harness. Get some wire and the soldering gun out, and make them long enough to fit.
5) Injector wires need to be re-routed up along the engine side of the TB, don't leave them in the stock position when you install the RBC or they'll get jammed in there.
6) A/C line. Look closely at the Karcepts picture install on this. You have to flip the bracket and force the A/C line down and to the right. It is a pain to get in the right position. See 10 as well.
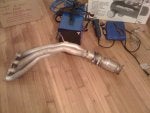
7) Fuel Rail doesn't fit on the RBC. You're gonna have to drill out the bolt holes to make them wider. Problem with this is you're drilling a fuel rail full of gasoline and it's hard to get out. I took off what looks to be the FPR in order to get most of the gas out.
8)Be careful using washers when attaching the TB adapter to the RBC. Make sure that the bolt heads don't protrude at all or you'll get vacuum leak.
9) Vacuum leaks: you will need to check for vacuum leaks or it won't run/sound right. Use Carb/intake cleaner and spray around the joints, make sure everything is tight.
10) Take the throttle cable holder which is attached to the TB and move it to the RBC. It won't work any more in the stock position since the A/C line gets in the way. You can see this in my pictures.
11) The big vacuum line next to the TB on the Intake Manifold needs to be bent up in order for the hose to fit on. Take a phillip's head screwdriver stick it in and bend it up and to the left so the hose clears. Be careful not to pull it too far up as this may affect hood closure.
Tips:
1) Double bolt/nut: Both Head studs need to come out to get the RBC into position, and it makes the PRC easier to get out. You do this by putting a second nut on the stud and tightening them together. Then you can remove and reinstall the studs.
2) Your cutting on the RBC need to be exact, and close to the gasket template.
3) 02-04 and 05-06 TB gaskets are different, if you order some off the internet make sure the person you're ordering from knows they're different or you'll be making modifications.
4) MAP and TPS clips are the exact same, make sure you know which is which when you take them off, or else you'll be extending both of them. BTW, don't just unwrap your harness. Get some wire and the soldering gun out, and make them long enough to fit.
5) Injector wires need to be re-routed up along the engine side of the TB, don't leave them in the stock position when you install the RBC or they'll get jammed in there.
6) A/C line. Look closely at the Karcepts picture install on this. You have to flip the bracket and force the A/C line down and to the right. It is a pain to get in the right position. See 10 as well.
7) Fuel Rail doesn't fit on the RBC. You're gonna have to drill out the bolt holes to make them wider. Problem with this is you're drilling a fuel rail full of gasoline and it's hard to get out. I took off what looks to be the FPR in order to get most of the gas out.
8)Be careful using washers when attaching the TB adapter to the RBC. Make sure that the bolt heads don't protrude at all or you'll get vacuum leak.
9) Vacuum leaks: you will need to check for vacuum leaks or it won't run/sound right. Use Carb/intake cleaner and spray around the joints, make sure everything is tight.
10) Take the throttle cable holder which is attached to the TB and move it to the RBC. It won't work any more in the stock position since the A/C line gets in the way. You can see this in my pictures.
11) The big vacuum line next to the TB on the Intake Manifold needs to be bent up in order for the hose to fit on. Take a phillip's head screwdriver stick it in and bend it up and to the left so the hose clears. Be careful not to pull it too far up as this may affect hood closure.