

Ok guys this is going to be a bit of a work in progress as I am building the motor at this current time. As my motor is being put together. (By ME) More and more information and pictures will be posted. I am not responsible for your car if you follow my diagram setup and things don't work for your build. I am just doing this as I have time. Which I don't have a lot of so I probably wont be able to put every kind of detail about building this kind of Setup.
First and foremost. If you are building a K24/K20. Dont leave the old stock bearings or something like that thinking they're fine. I thought my motor had OEM bearings. Tore it apart. It had aftermarkets. 60k Mile motor. Just think about that when your doing your build.
First things I did was research what other people had tried to do to make their setup possible. I then saw that not many people knew much about the entire building of these type of FRANKS anyway. The shops want you to go to them to do these types of things. Being mainly why there is no information on the build out there other than making sure you plug the Oil jet hole on the crank girdle.
First thing: DO your RESEARCH.
2nd: Decide if your trying to go all motor or Boost. This will determine the Compression ratio of the pistons you will want to use. 12.5.1 I have heard is the highest you can run on pump gas for all motor. I went with this because I just had a motor blow up on boost and I was over boost at that point. Boost you prolly would want to go with 10.1ish. Your decision your build.
3rd: I bought a micrometer and checked my bore of my Block. I knew mine didn't need bored. BUT YOURS MIGHT. I took mine to a shop afterwards and had my Block hot tanked. Along with my head. I also had to have my crank journals polished because my motor was showing a lot of dirty oil from probably when the previous owner didn't change the oil for 10K miles or so.
4th: I went and got my stuff from the shop had my head built because I am running cams that need specific valve lash specs for my custom Prayoonto Cams.
5th: I then took my crank and was trying to get OEM main bearings. I called a Honda dealership.. My motor is out of a 03 Honda Accord. They walked me through where to find the proper markings on the crank to direct me to the correct bearings for them to order for me. On the crank pulley side of the crank on the 1st Rod journal side. Mine said... BBBB, and my number coding for my crank was 44544. Meaning. Green, Green, Brown, Green, Green. Had these ordered by Honda and also you will need to order a new REAR MAIN SEAL. Unless you would like yours to leak oil. For 12$ if you want your motor to be right you should pick one up. Also will need to buy a New K24 Timing chain, Timing chain tensioner, and oil pump chain. If you are wanting to buy an oil pump entire setup, and or a Timing setup you could do either of these as well. But you will need a K24 timing guide, K20z3 Timing camshaft guide, and a K24 Guide arm.

OIL pump Kit: http://afhkparts.com/shop/jdm/k20-rsx-type-s-oil-pump-kit/
Timing Components: http://afhkparts.com/shop/kswap-honda-parts/k24-frank-essential-package-3/
6th: Im going to get down to the assembling of the motor here right now. Then when I take some pictures more stuff will come up and fill in the blank for you fellow members. Main Bearings. You need to purchase grease this is a newly built motor. It needs lubrication at first that only oil can't give it. DO NOT. I REPEAT DOOOO NOT PUT GREASE ON THE BOTTOM PARTS OF THE MAIN BEARINGS. THIS WILL CAUSE YOU TO SPIN A BEARING ON INITIAL START UP. You use the code on the crank in the picture I put above to determine where each bearing goes. you place the bearings down and in having the mark go into the small notch in the block itself. You then apply a thin coating of grease where the bearing will be up against the Crank. ONLY ON THIS SIDE YOU WILL USE THE GREASE. Apply very Lightly throughout the entire bearing. Then next before you put the crank in you will need to install the thrust washers. The thrust washers must be greased. Both sides of the thrust washers need to be greased completely all over evenly.
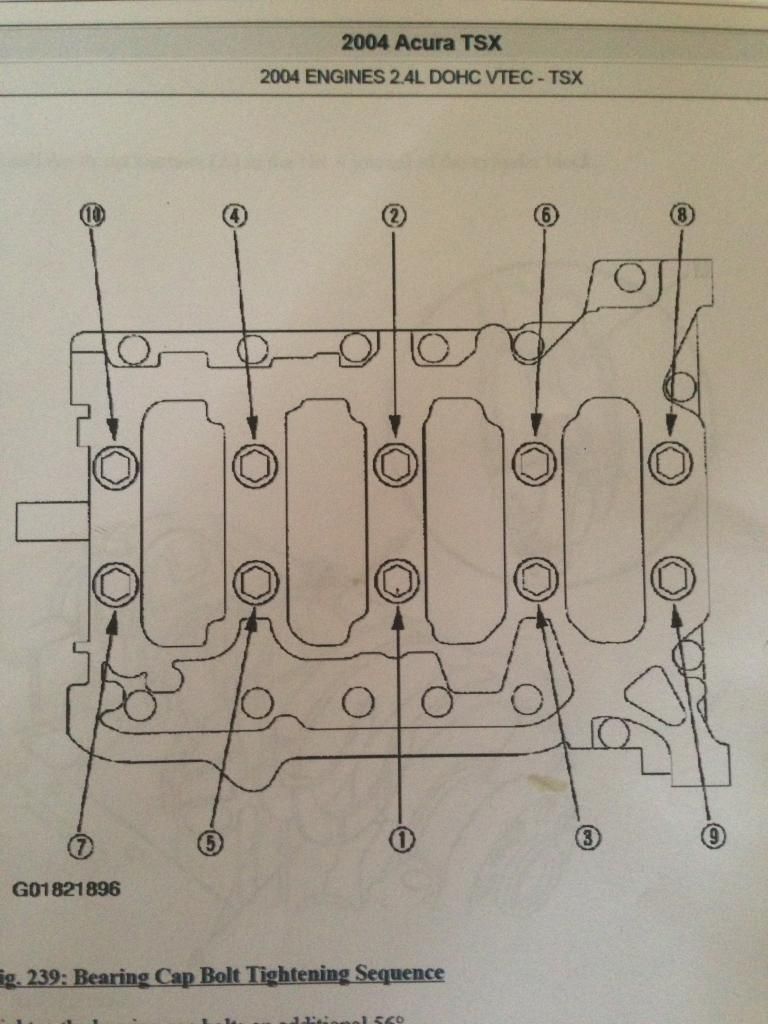
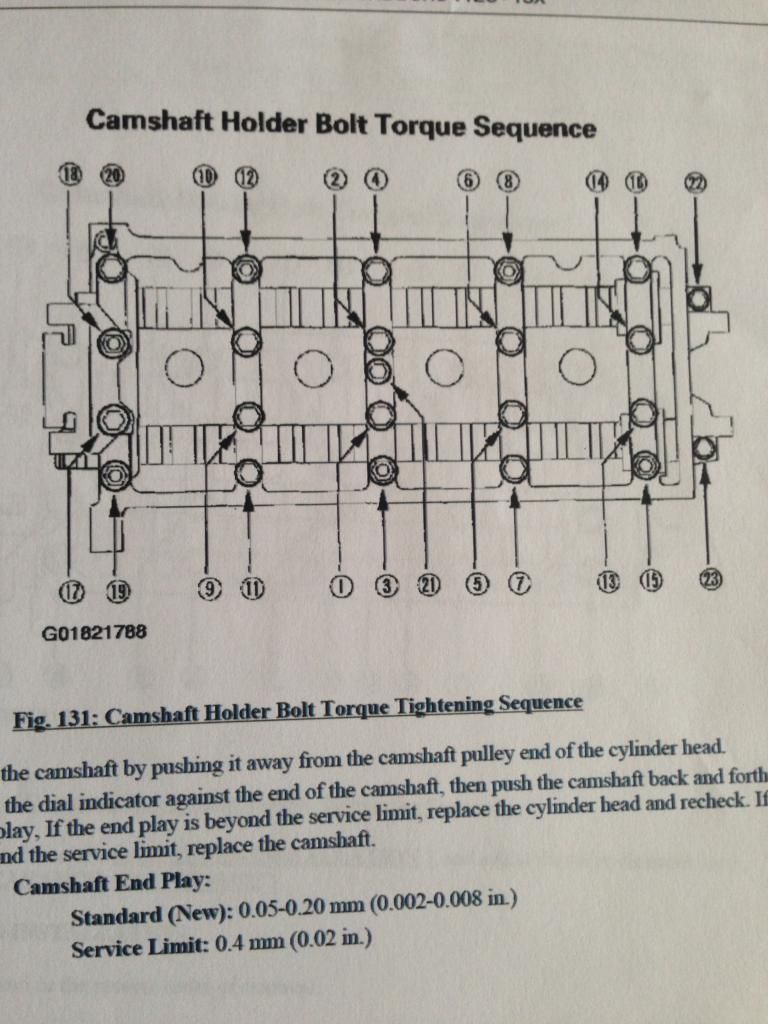
7th: Have the crank ready. It is much easier to do it yourself if you grab where the bolt is that goes through the crank pulley as well as get ahold of the side that the flywheel bolts up to. GENTLY PUT THE CRANK DOWN. DO NOT SPIN THE CRANK. After I got the crank put in I checked THE THRUST WASHERS AND MAKE SURE THAT WHEN YOU PUT THE CRANK IN THAT THEY DIDN'T MOVE OUT OF PLACE. VERY IMPORTANT! After Mine were lined up I grabbed HONDABOND/RTV sealant and put it All over the outside seals of the motor where the girdle bolts down all over the outside of it. Then I greased the bearings on the side TWORDS THE CRANK. Put them in the girdle with the notches matching with the bearings and girdle and placed the girdle softly down ontop of the block/crank you will need to set it down almost perfectly for them to line up tight. If you are reusing your old girdle bolts clean them up. Then before you start cranking down the bolts. Dip them in NEW OIL that you plan on running in your new motor. I tightened mine down in 4 steps. 10ft pounds on the first time, 15ft pounds the 2nd round and 22ft pounds the 3rd round. COMPLETE EACH ROUND ON EVERY BOLT BEFORE PASSING CLEAR TO 22FT pounds. This prevents bending/warping the girdle. Then after the 22ft-pounds you need to rotate the bolt 56 DEGREES and then you have the girdle crank bolts properly tightened down. Here is a picture of the Pattern you will want to follow when tightening down the Crank/Girdle Bolts.
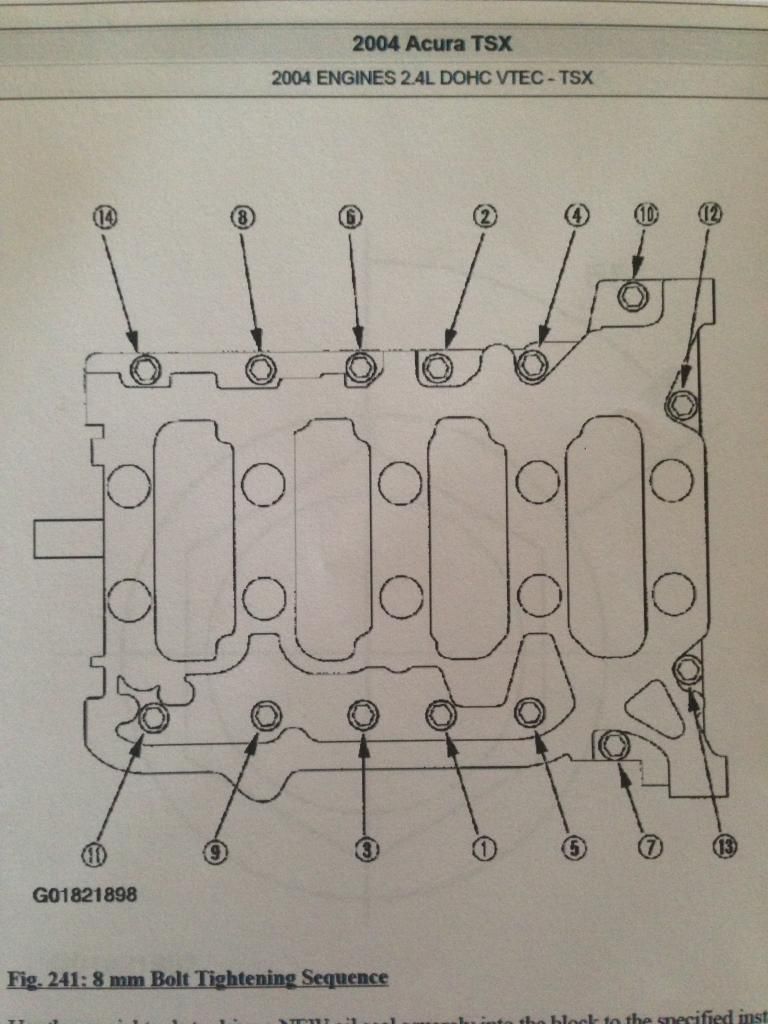
The Outside girdle bolts have a certain spec to be tightened down to. 16ft-lbs. I did mine in 2 steps I went 10ft-lbs and then 16ft-lbs just to be safe on it. The diagram to follow is below.
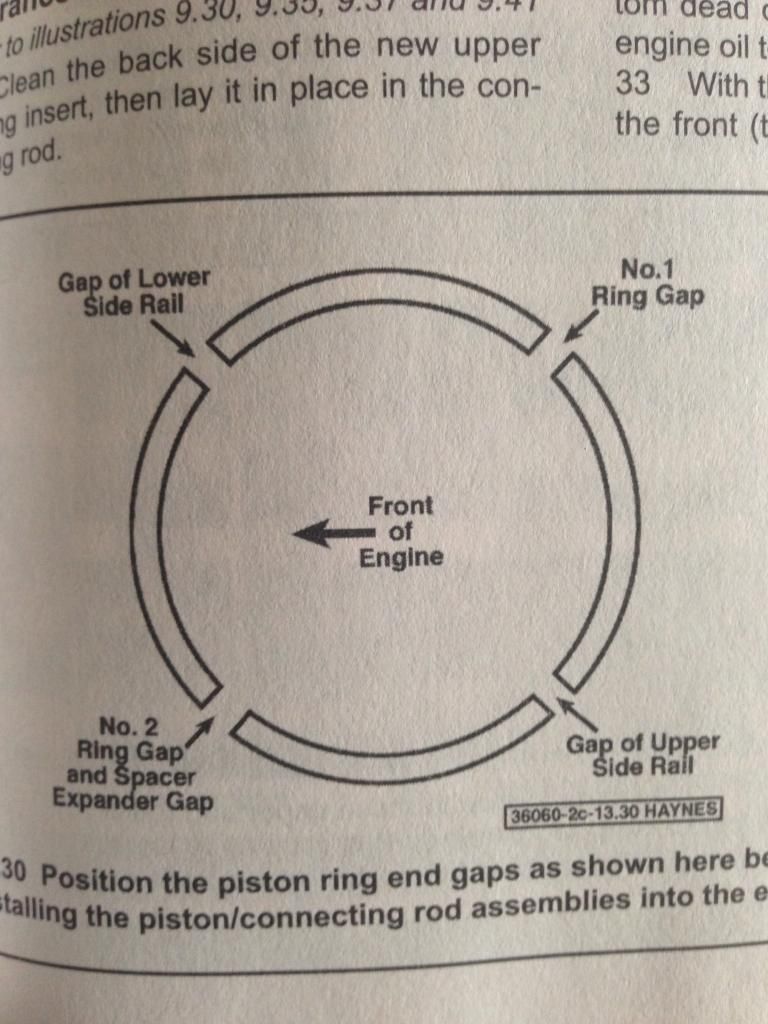
I made a video of how to properly install your piston rings and having them properly clocked to get the job done. One of my dads friends works for summit and he gave me a diagram of how they clock their rings so that is what I followed.
Here is a Removal Video for your old Piston Rings.
https://www.youtube.com/watch?v=mJNFUYg47Bg
Here is a Installation Video for your new Piston Rings.
https://www.youtube.com/watch?v=k-JWU46HwdA
If you don't want to watch the video here is a picture.
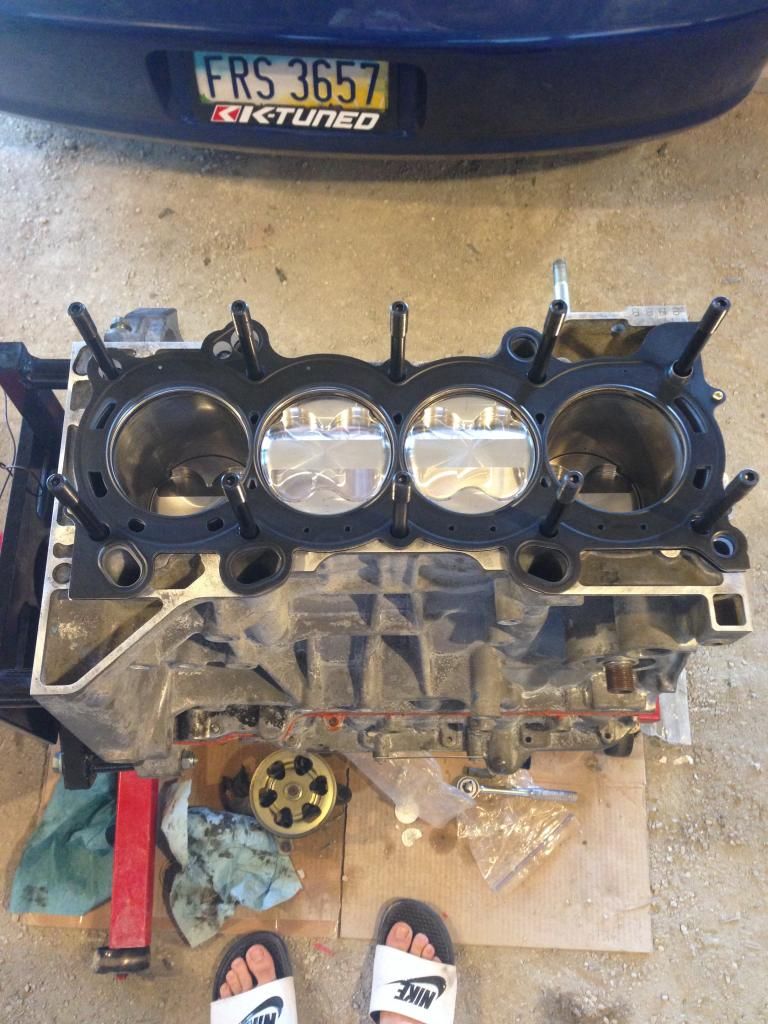
8th: I then focused on getting the pistons ready because I didn't have a ring compressor yet so I wanted to get rid of some time that I would be later be wasting time doing anyways. I got my Pistons how I wanted and installed the C clips to hold in the wristpins. Make sure you put grease on the wristpin. You then will need to compress down the Rings to insert the piston. You will want to mark your Pistons sides Intake/Exhaust. The Intake side has a bigger side for the larger valves. Make sure you do this or your Pistons will contact your valves on first startup.
The ring compressor will need to be wiped with oil same as the Piston rings right before attempting to insert them. You DO NOT Want to force the Piston in. Work the piston down then after its to the ring part you will want to use a rubber mallet to pop it down past the rings. If it feels forced pull the piston out and do it until it doesn't feel forced. Then bolt up your rod endcaps. My Eagle rods ARP-2000 1.5 needed to be tightened to 43ft-lbs. Then all the pistons are in and you turn the crank over to make sure you dont hear scratching on the Cylinder walls your good to go.
9th: I then went to install my Head gasket. My head gasket needed to be thicker than the previous stock headgasket on my K20.
Make sure that you have both Dowlpins installed on the intake side of the top of the block to properly lign up the cylinders. I lost one and later found it and had to tear the entire cams/head back off. Also will want to make sure that the small Washers built into the gasket aren't contacting where the block is going to be making contact with the head.
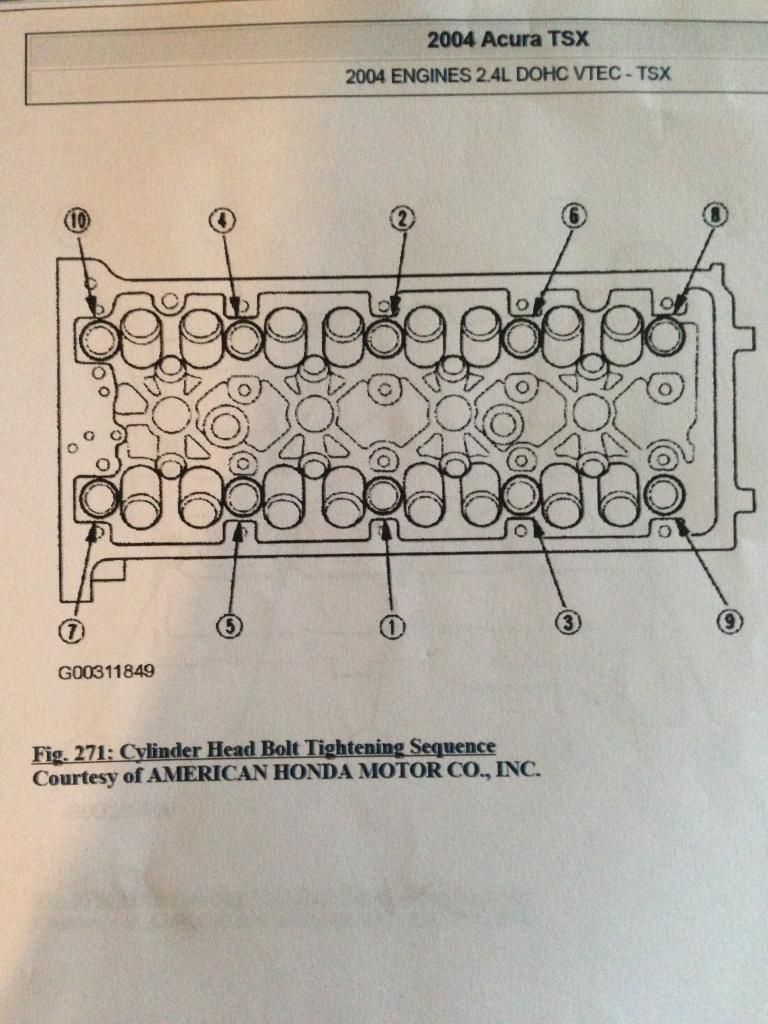
10th: I then started installing my arp head studs. Fingertightening them first and using the assembly lube that came with the setup. Then on the bottom of the washer I also installed the assembly lube and tightened the head down in this order to prevent warping in 3 equal steps after the 3 steps my head studs were tightened to 80ft-lbs.
Step 9+ARP Head Studs^
Then Head installed
11th: I worked on Putting my Prayoonto Stage 4 Custom cams in. I hot tanked mine myself. Boiled a Pan of water put it in my bathtub let it set in there til it was clean. I DID THIS WITH MY OEM CAMS installed with the rocker assembly still. Then let it air dry outside in the hot sun. THERE ARE SPRINGS THAT ARE IN THE ROCKER ARMS. DO NOT LOOSE THESE. YOU DON'T HAVE 1 OF THEM AND GUESS WHAT YOUR VTEC ISN'T GOING TO ENGAGE AT ALL. Anyways, here is a Video of what I did. I used a impact to get the cam gears off the cams. 17mm socket, and a 14mm Socket. The allen wrench end I believe was a 8mm allen wrench. After you pull off the old cams. You will want to wipe down the part where the cam lays. Use a microfiber cloth you do not want to scratch this. After it is all clean hook up the allen wrench head bolt and the 17/14mm bolts that are holding on the cam gears. Then you need to grease them after getting both the top and bottom greased turn the cams a little back and fourth to get them lubed up Store them then in a place they wont collect dust/dirt.
http://youtu.be/URKuQuKCNoc
YOU NEED TO GREASE the heck out of the lobes of the cam that are touching the parts of the head that are making contact with the cams..
12th: Installing the Rocker arms/cams onto the head. I had help from the girlfriend to help me keep the rocker arms up the first few times I attempted to get these bad boys in. Then after I had to tear down everything I got the experience of doing it myself. This is a task my friends. It is not easy. What I did was I decided to take the rocker arms and use a piece of tape for each set and tape them up around the top of the cam holder bolts were. Went out set it down and it was easy as cake. I suggest if doing this yourself to make sure you tape them up or have a few extra hands their that can hold them up while you are trying to lign up the cam bolt holders.
13th: PUTTING THE CAR IN TIME. THIS IS PROBABLY THE MOST IMPORTANT STEP BECAUSE IF ITS NOT IN TIME ITS NOT GOING TO RUN LONG AND AT ALL FOR THAT MATTER. You will want to grab a wrench and have someone there to hold the cam gear while you are trying to setup the chain. Since I still don't have my modified oil pump from 4piston I went ahead and put my oil chain pump on so I didn't have to go through this step again. I ligned up the chain with the 2 gold marks on each side of the dot on the top of the cam and also there will be a mark on the crank that you will want to have properly ligned up before trying to get it in time. MAKE SURE YOUR 1st piston in Cylinder 1 is TDC. If it's not then you will have to do this whole step again. I used 2 extensions to tell that mine was at TDC. Then after getting the chain placed properly you will want to install the tensioner. After bolting it up pull out the pin and it will pop out to the timing guide arm. After this you will want to use a flat head screwdriver or even a pry bar to make a little more tension on the chain. I put it between the tensioner and the arm and pryed the arm back and heard the tensioner click twice and mine was tight enough I didn't have to worry about it anymore. If you do not Pry the Tensioner arm to put more tension I almost guarantee that your motor will jump time. Do yourself a favor and make sure you get a couple of clicks extra.
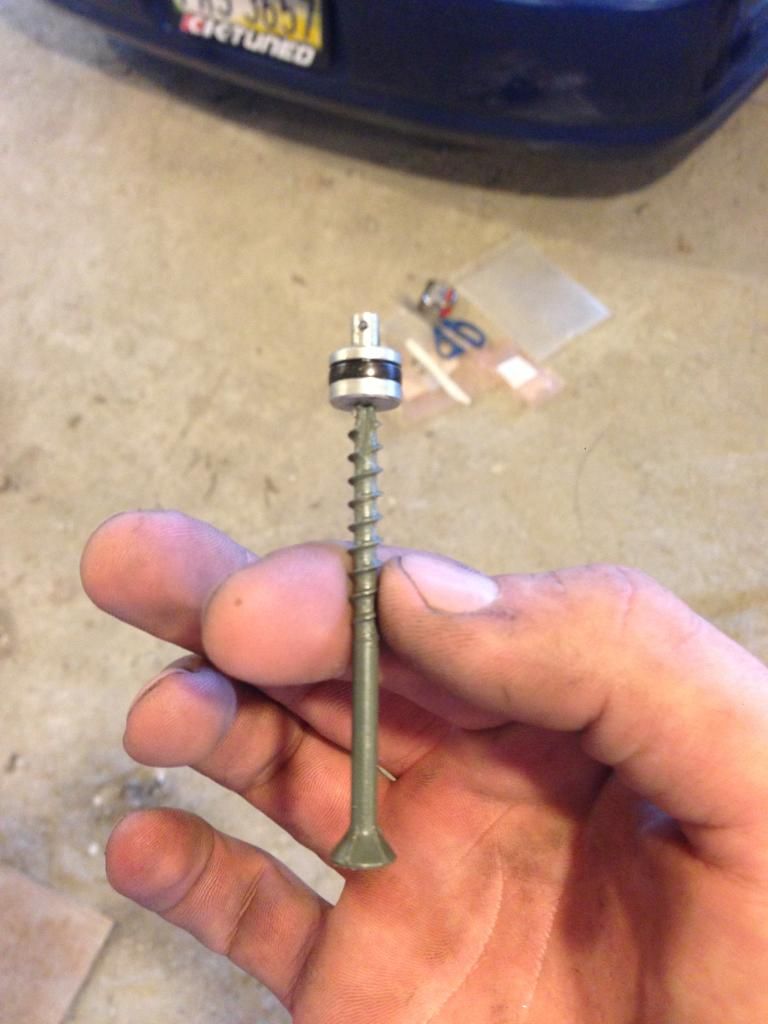
Mini Step. YOU WILL NEED TO PULL OUT THE OIL JET BEFORE INSTALLING THE OIL PUMP/BAFFLE. I used a wood screw and tapped it with a hammer. I then got a Bolt and I believe it was a 12mm and put Rtv in the previous hole where the oil jet was to block the Oil.
Step 14: Putting on your Modified Oil Pump. Before you bolt the pump down get the chain in the teeth of the oil pump. Then you can bolt it down. this is the only way you will be able to get the chain on the pump properly. If you dont do it this way you could damage the chain or stretch it and you dont want to do that.
Step 15: Get your oil pan and your K24 chain cover and put some RTV on it just like in the picture below.
You then will want to install your VTC Sensor. Also when you are putting your chain cover on you will want to have put the K20 Crank position sensor put into the chain cover.
Step 16: You will need to use the Belt tensioner from your K20 if you dont have one on the K24. I deleted my AC I used a 53.5 inch belt to do this. Basically after getting your belt you will want to button up your Water pump, Power steering pump, Alternator and run the belt as I have it ran in this picture below.
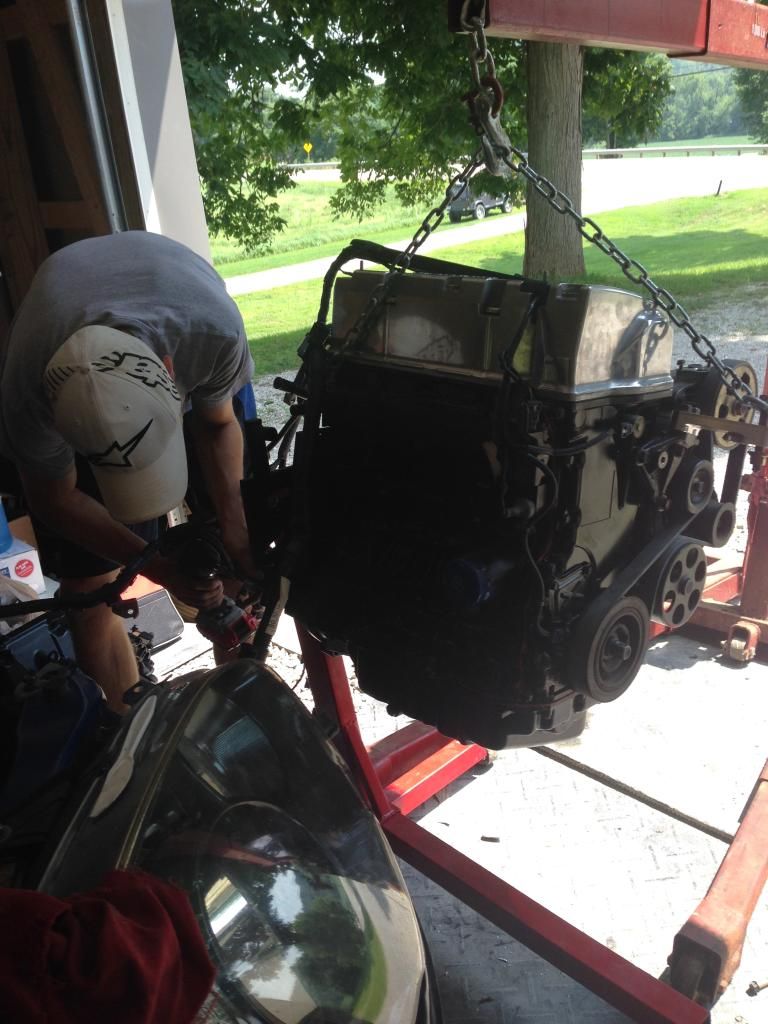
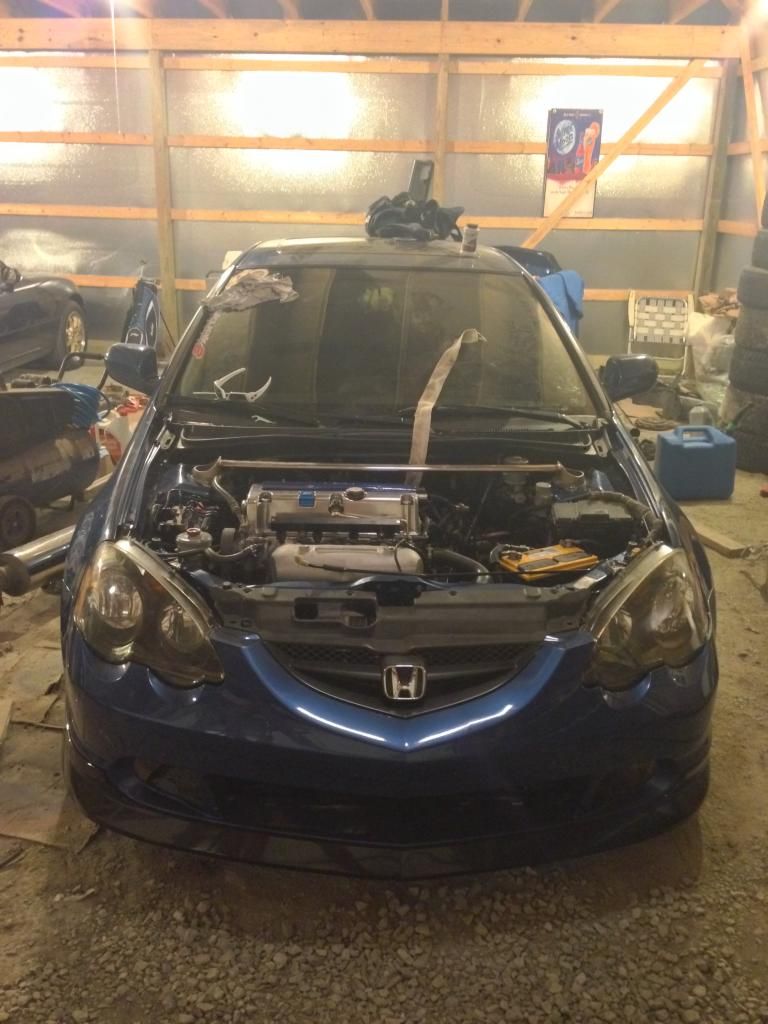
Step 17: Drop the motor in the CAR! WHOOOOOP. Im not gonna waste my time telling you how to button up your TB or Intake Manifold there are many other DIYs for that. But boom you just built your K24!
After all this was done I decided to switch over my Sensors from my old block to my new one.
Switched my Knock Sensor, Oil Sending Unit, Crank Position Sensor, I didn't move my oil cooler over to my new engine seeming how that is a not really needed mod. You also will need a CRV passenger side mount.
And ALSO on the head installation. I forgot to put the LMA springs in the head went and had the car dynoed and now have to clean the motor out and have the head redone again so I will be sending mine out to 4piston to do a moderate port and polish! DO NOT FORGET TO PUT THOSE SPRINGS IN THE HEAD LIKE ME.
First and foremost. If you are building a K24/K20. Dont leave the old stock bearings or something like that thinking they're fine. I thought my motor had OEM bearings. Tore it apart. It had aftermarkets. 60k Mile motor. Just think about that when your doing your build.
First things I did was research what other people had tried to do to make their setup possible. I then saw that not many people knew much about the entire building of these type of FRANKS anyway. The shops want you to go to them to do these types of things. Being mainly why there is no information on the build out there other than making sure you plug the Oil jet hole on the crank girdle.
First thing: DO your RESEARCH.
2nd: Decide if your trying to go all motor or Boost. This will determine the Compression ratio of the pistons you will want to use. 12.5.1 I have heard is the highest you can run on pump gas for all motor. I went with this because I just had a motor blow up on boost and I was over boost at that point. Boost you prolly would want to go with 10.1ish. Your decision your build.
3rd: I bought a micrometer and checked my bore of my Block. I knew mine didn't need bored. BUT YOURS MIGHT. I took mine to a shop afterwards and had my Block hot tanked. Along with my head. I also had to have my crank journals polished because my motor was showing a lot of dirty oil from probably when the previous owner didn't change the oil for 10K miles or so.
4th: I went and got my stuff from the shop had my head built because I am running cams that need specific valve lash specs for my custom Prayoonto Cams.
5th: I then took my crank and was trying to get OEM main bearings. I called a Honda dealership.. My motor is out of a 03 Honda Accord. They walked me through where to find the proper markings on the crank to direct me to the correct bearings for them to order for me. On the crank pulley side of the crank on the 1st Rod journal side. Mine said... BBBB, and my number coding for my crank was 44544. Meaning. Green, Green, Brown, Green, Green. Had these ordered by Honda and also you will need to order a new REAR MAIN SEAL. Unless you would like yours to leak oil. For 12$ if you want your motor to be right you should pick one up. Also will need to buy a New K24 Timing chain, Timing chain tensioner, and oil pump chain. If you are wanting to buy an oil pump entire setup, and or a Timing setup you could do either of these as well. But you will need a K24 timing guide, K20z3 Timing camshaft guide, and a K24 Guide arm.

OIL pump Kit: http://afhkparts.com/shop/jdm/k20-rsx-type-s-oil-pump-kit/
Timing Components: http://afhkparts.com/shop/kswap-honda-parts/k24-frank-essential-package-3/
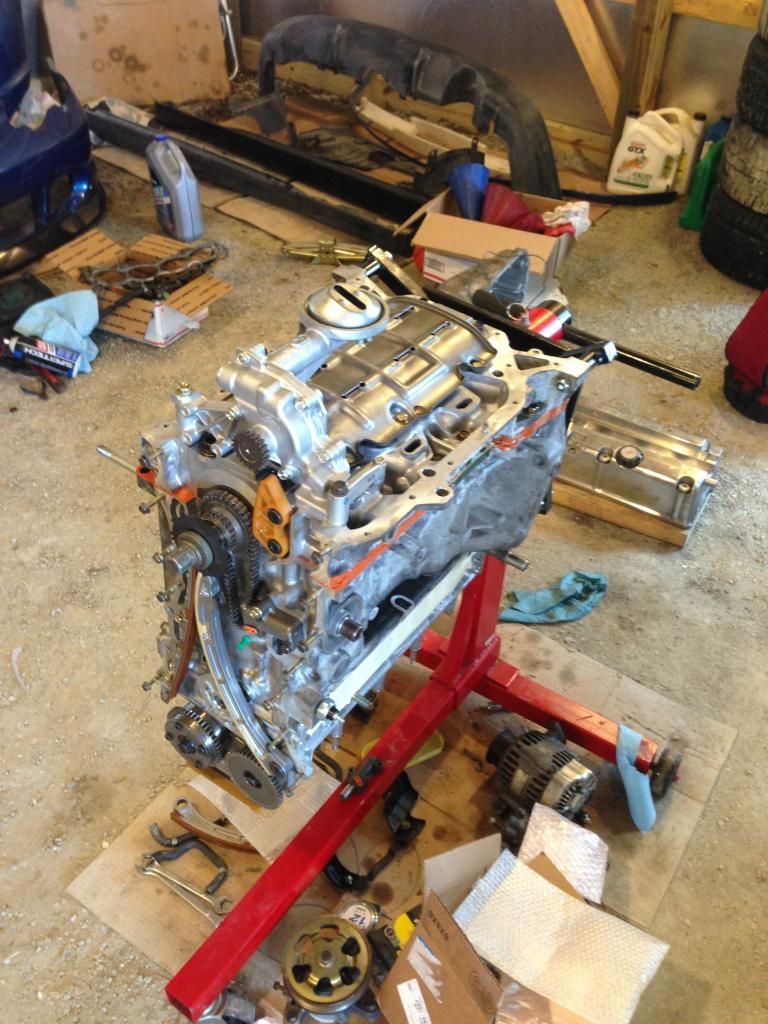
6th: Im going to get down to the assembling of the motor here right now. Then when I take some pictures more stuff will come up and fill in the blank for you fellow members. Main Bearings. You need to purchase grease this is a newly built motor. It needs lubrication at first that only oil can't give it. DO NOT. I REPEAT DOOOO NOT PUT GREASE ON THE BOTTOM PARTS OF THE MAIN BEARINGS. THIS WILL CAUSE YOU TO SPIN A BEARING ON INITIAL START UP. You use the code on the crank in the picture I put above to determine where each bearing goes. you place the bearings down and in having the mark go into the small notch in the block itself. You then apply a thin coating of grease where the bearing will be up against the Crank. ONLY ON THIS SIDE YOU WILL USE THE GREASE. Apply very Lightly throughout the entire bearing. Then next before you put the crank in you will need to install the thrust washers. The thrust washers must be greased. Both sides of the thrust washers need to be greased completely all over evenly.
7th: Have the crank ready. It is much easier to do it yourself if you grab where the bolt is that goes through the crank pulley as well as get ahold of the side that the flywheel bolts up to. GENTLY PUT THE CRANK DOWN. DO NOT SPIN THE CRANK. After I got the crank put in I checked THE THRUST WASHERS AND MAKE SURE THAT WHEN YOU PUT THE CRANK IN THAT THEY DIDN'T MOVE OUT OF PLACE. VERY IMPORTANT! After Mine were lined up I grabbed HONDABOND/RTV sealant and put it All over the outside seals of the motor where the girdle bolts down all over the outside of it. Then I greased the bearings on the side TWORDS THE CRANK. Put them in the girdle with the notches matching with the bearings and girdle and placed the girdle softly down ontop of the block/crank you will need to set it down almost perfectly for them to line up tight. If you are reusing your old girdle bolts clean them up. Then before you start cranking down the bolts. Dip them in NEW OIL that you plan on running in your new motor. I tightened mine down in 4 steps. 10ft pounds on the first time, 15ft pounds the 2nd round and 22ft pounds the 3rd round. COMPLETE EACH ROUND ON EVERY BOLT BEFORE PASSING CLEAR TO 22FT pounds. This prevents bending/warping the girdle. Then after the 22ft-pounds you need to rotate the bolt 56 DEGREES and then you have the girdle crank bolts properly tightened down. Here is a picture of the Pattern you will want to follow when tightening down the Crank/Girdle Bolts.

The Outside girdle bolts have a certain spec to be tightened down to. 16ft-lbs. I did mine in 2 steps I went 10ft-lbs and then 16ft-lbs just to be safe on it. The diagram to follow is below.

I made a video of how to properly install your piston rings and having them properly clocked to get the job done. One of my dads friends works for summit and he gave me a diagram of how they clock their rings so that is what I followed.
Here is a Removal Video for your old Piston Rings.
https://www.youtube.com/watch?v=mJNFUYg47Bg
Here is a Installation Video for your new Piston Rings.
https://www.youtube.com/watch?v=k-JWU46HwdA
If you don't want to watch the video here is a picture.

8th: I then focused on getting the pistons ready because I didn't have a ring compressor yet so I wanted to get rid of some time that I would be later be wasting time doing anyways. I got my Pistons how I wanted and installed the C clips to hold in the wristpins. Make sure you put grease on the wristpin. You then will need to compress down the Rings to insert the piston. You will want to mark your Pistons sides Intake/Exhaust. The Intake side has a bigger side for the larger valves. Make sure you do this or your Pistons will contact your valves on first startup.
The ring compressor will need to be wiped with oil same as the Piston rings right before attempting to insert them. You DO NOT Want to force the Piston in. Work the piston down then after its to the ring part you will want to use a rubber mallet to pop it down past the rings. If it feels forced pull the piston out and do it until it doesn't feel forced. Then bolt up your rod endcaps. My Eagle rods ARP-2000 1.5 needed to be tightened to 43ft-lbs. Then all the pistons are in and you turn the crank over to make sure you dont hear scratching on the Cylinder walls your good to go.
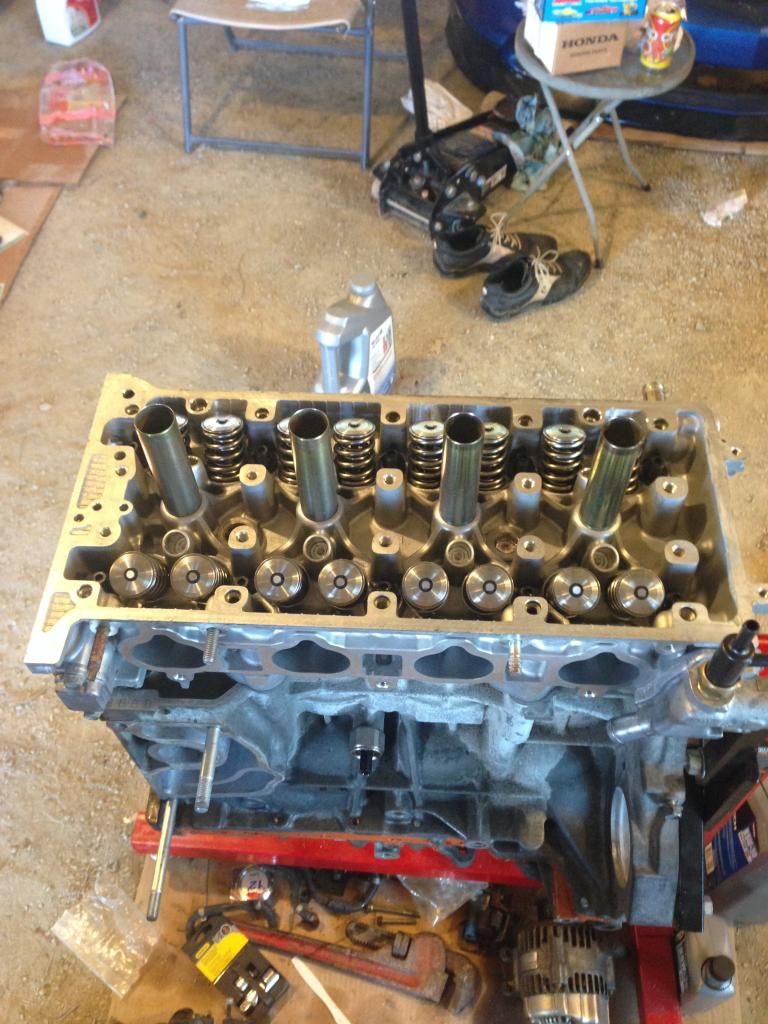
9th: I then went to install my Head gasket. My head gasket needed to be thicker than the previous stock headgasket on my K20.
Make sure that you have both Dowlpins installed on the intake side of the top of the block to properly lign up the cylinders. I lost one and later found it and had to tear the entire cams/head back off. Also will want to make sure that the small Washers built into the gasket aren't contacting where the block is going to be making contact with the head.
10th: I then started installing my arp head studs. Fingertightening them first and using the assembly lube that came with the setup. Then on the bottom of the washer I also installed the assembly lube and tightened the head down in this order to prevent warping in 3 equal steps after the 3 steps my head studs were tightened to 80ft-lbs.


Step 9+ARP Head Studs^
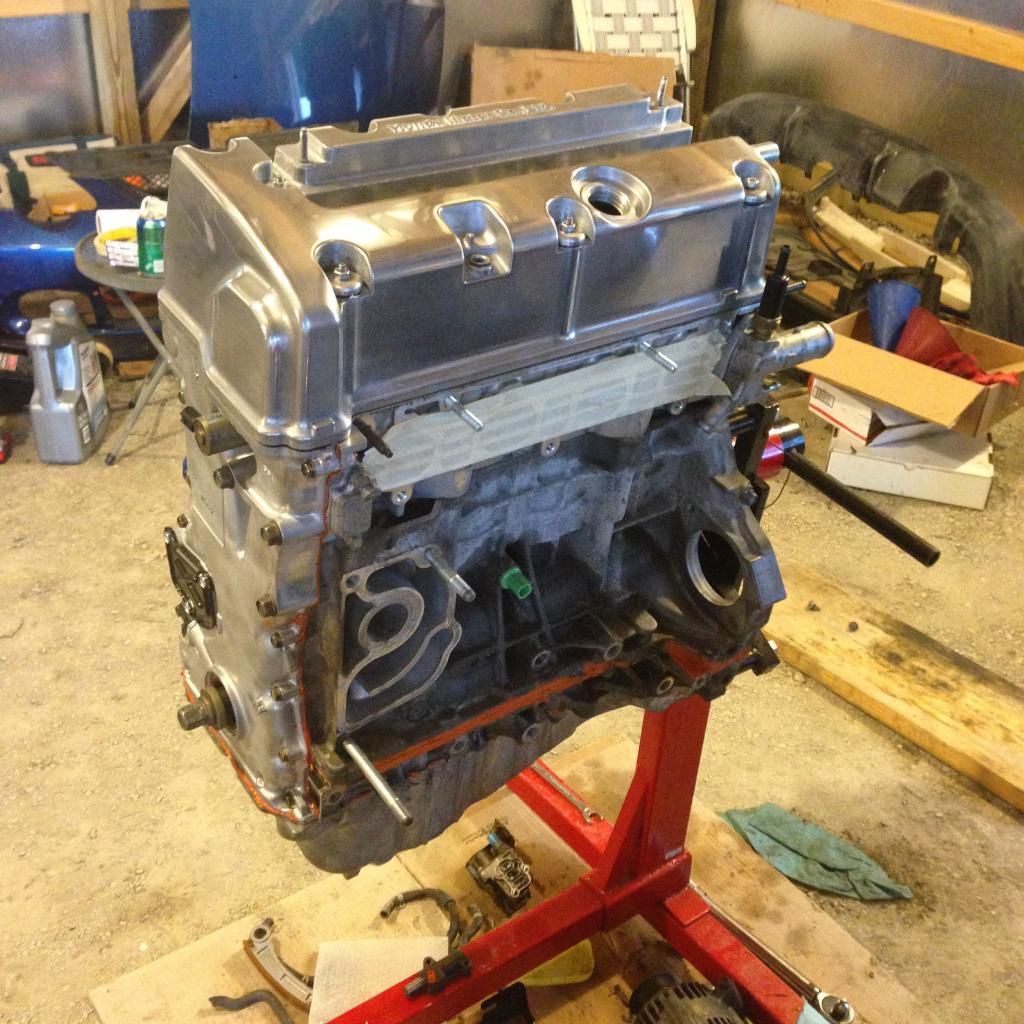
Then Head installed

11th: I worked on Putting my Prayoonto Stage 4 Custom cams in. I hot tanked mine myself. Boiled a Pan of water put it in my bathtub let it set in there til it was clean. I DID THIS WITH MY OEM CAMS installed with the rocker assembly still. Then let it air dry outside in the hot sun. THERE ARE SPRINGS THAT ARE IN THE ROCKER ARMS. DO NOT LOOSE THESE. YOU DON'T HAVE 1 OF THEM AND GUESS WHAT YOUR VTEC ISN'T GOING TO ENGAGE AT ALL. Anyways, here is a Video of what I did. I used a impact to get the cam gears off the cams. 17mm socket, and a 14mm Socket. The allen wrench end I believe was a 8mm allen wrench. After you pull off the old cams. You will want to wipe down the part where the cam lays. Use a microfiber cloth you do not want to scratch this. After it is all clean hook up the allen wrench head bolt and the 17/14mm bolts that are holding on the cam gears. Then you need to grease them after getting both the top and bottom greased turn the cams a little back and fourth to get them lubed up Store them then in a place they wont collect dust/dirt.
http://youtu.be/URKuQuKCNoc
YOU NEED TO GREASE the heck out of the lobes of the cam that are touching the parts of the head that are making contact with the cams..
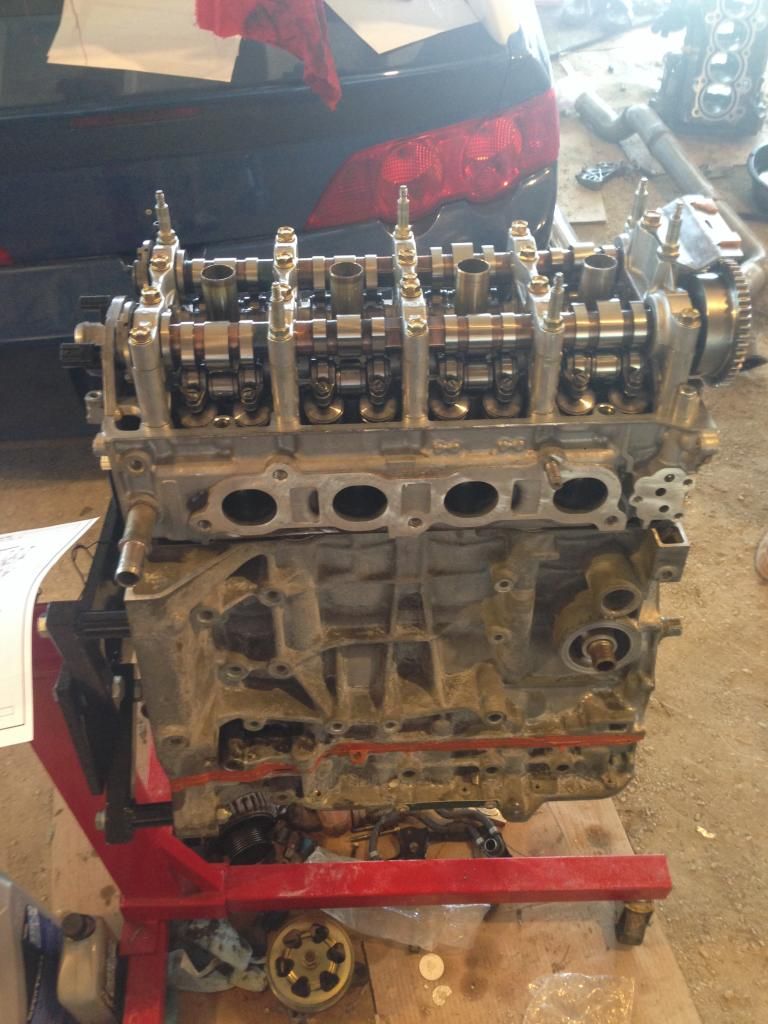
12th: Installing the Rocker arms/cams onto the head. I had help from the girlfriend to help me keep the rocker arms up the first few times I attempted to get these bad boys in. Then after I had to tear down everything I got the experience of doing it myself. This is a task my friends. It is not easy. What I did was I decided to take the rocker arms and use a piece of tape for each set and tape them up around the top of the cam holder bolts were. Went out set it down and it was easy as cake. I suggest if doing this yourself to make sure you tape them up or have a few extra hands their that can hold them up while you are trying to lign up the cam bolt holders.


13th: PUTTING THE CAR IN TIME. THIS IS PROBABLY THE MOST IMPORTANT STEP BECAUSE IF ITS NOT IN TIME ITS NOT GOING TO RUN LONG AND AT ALL FOR THAT MATTER. You will want to grab a wrench and have someone there to hold the cam gear while you are trying to setup the chain. Since I still don't have my modified oil pump from 4piston I went ahead and put my oil chain pump on so I didn't have to go through this step again. I ligned up the chain with the 2 gold marks on each side of the dot on the top of the cam and also there will be a mark on the crank that you will want to have properly ligned up before trying to get it in time. MAKE SURE YOUR 1st piston in Cylinder 1 is TDC. If it's not then you will have to do this whole step again. I used 2 extensions to tell that mine was at TDC. Then after getting the chain placed properly you will want to install the tensioner. After bolting it up pull out the pin and it will pop out to the timing guide arm. After this you will want to use a flat head screwdriver or even a pry bar to make a little more tension on the chain. I put it between the tensioner and the arm and pryed the arm back and heard the tensioner click twice and mine was tight enough I didn't have to worry about it anymore. If you do not Pry the Tensioner arm to put more tension I almost guarantee that your motor will jump time. Do yourself a favor and make sure you get a couple of clicks extra.
Mini Step. YOU WILL NEED TO PULL OUT THE OIL JET BEFORE INSTALLING THE OIL PUMP/BAFFLE. I used a wood screw and tapped it with a hammer. I then got a Bolt and I believe it was a 12mm and put Rtv in the previous hole where the oil jet was to block the Oil.

Step 14: Putting on your Modified Oil Pump. Before you bolt the pump down get the chain in the teeth of the oil pump. Then you can bolt it down. this is the only way you will be able to get the chain on the pump properly. If you dont do it this way you could damage the chain or stretch it and you dont want to do that.

Step 15: Get your oil pan and your K24 chain cover and put some RTV on it just like in the picture below.

You then will want to install your VTC Sensor. Also when you are putting your chain cover on you will want to have put the K20 Crank position sensor put into the chain cover.
Step 16: You will need to use the Belt tensioner from your K20 if you dont have one on the K24. I deleted my AC I used a 53.5 inch belt to do this. Basically after getting your belt you will want to button up your Water pump, Power steering pump, Alternator and run the belt as I have it ran in this picture below.

Step 17: Drop the motor in the CAR! WHOOOOOP. Im not gonna waste my time telling you how to button up your TB or Intake Manifold there are many other DIYs for that. But boom you just built your K24!

After all this was done I decided to switch over my Sensors from my old block to my new one.
Switched my Knock Sensor, Oil Sending Unit, Crank Position Sensor, I didn't move my oil cooler over to my new engine seeming how that is a not really needed mod. You also will need a CRV passenger side mount.
And ALSO on the head installation. I forgot to put the LMA springs in the head went and had the car dynoed and now have to clean the motor out and have the head redone again so I will be sending mine out to 4piston to do a moderate port and polish! DO NOT FORGET TO PUT THOSE SPRINGS IN THE HEAD LIKE ME.


